Gutenberg tutorial, how to program your first block
In all programming languages there is always a "hello, world!", the typical "hello world!«. And when it comes to programming blocks, it could be translated into creating a block that shows a text that you enter. This is the reason why we are going to program a simple but effective text block.
Contents
Creation of the block
Based on what was explained in the entry About preparing a workspace, let's start configuring the block. For this, we will first have to open the folder brok guten block and open a terminal in it. Then we will execute the command npm run create block-nameWhere block-name is the name of the block you want to create.
With this, we will go to the folder src/block-name and, once there, we now have to talk about some points. Let's explain the basic structure of a block, very important to learn to program them
????. Every block normally contains at least the following structure:
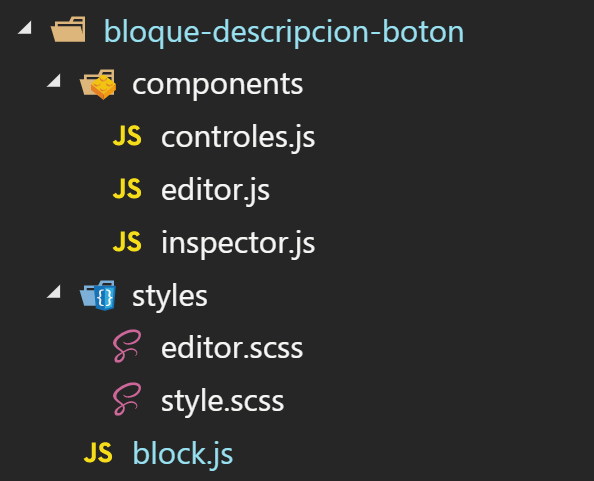
The block.js file, public content
The file block.js unites the entire structure by unifying the code and configuring the block. Also, specify its attributes, the registerGutenBlock method, and the content that readers will see of the block. From the above we will create separate entries for the tutorial due to its complexity.
In this file, we will have to fill in the variable atrs with an attribute to store the content of a paragraph. By simply adding this code, we can generate an attribute that stores the text that we enter in the paragraph:
/**
 * Atributos del bloque
 */

// Pasamos de esto
const attrs = {
  mwmAtributos, //Atributos de componentes internos de mowomo
};

// A esto otro
const attrs = {
  mwmAtributos,  //Atributos de componentes internos de mowomo
  parrafo: {
    type: "string",
    source: "html",
    selector: ".parrafo",
    default: "Texto del párrafo"
  }
};
Then in the function save (), we will change several points. First, we'll speed up access to attributes by creating intermediary variables between them and the save() function:
// Pasamos de esta línea
const { } = attributes;

// A esta otra
const { parrafo } = attributes;
We'll end up creating inside the return and the inside a paragraph whose value will be that of the attribute paragraph. For this we will use the component RichText.Content, which will display the content picked up by another RichText.
/**
 * Contenido del front-end del bloque
 */
return (
  <Fragment>
    <div className={"bloque-parrafo"}>
      <RichText.Content
        tagName={"p"}
        className={"parrafo"}
        value={parrafo}
      />
    </div>
  </Fragment>
);
So that, in the end, this code remains in the save() function:
save(props) {
    /**
     * Variables
     */
    const { attributes } = props;
    const { parrafo } = attributes;

    const estilos = {};

    /**
     * Funcionalidades
     */

    /**
     * Contenido del front-end del bloque
     */
    return (
      <Fragment>
        <div className={"bloque-parrafo"}>
          <RichText.Content
            tagName={"p"}
            className={"parrafo"}
            value={parrafo}
          />
        </div>
      </Fragment>
    );
  }
As a result, we will already have the public part of the block programmed, so we still have the editor part. Come on, we are already halfway through the process, there is nothing left to finish.
The editor.js file, editor content
Let's start by opening the file editor.js inside the folder components. This file will be a component of react, which we will talk about in another entry, and it will show us the part of the block in the WordPress admin.
We will do everything inside the method render() from the file. We will begin, then, by adding the attribute paragraph to the method variables taken from the attributes. With this, we will speed up the work with the attribute.
// Pasamos de esto
const { } = attributes;

// A esto
const { parrafo } = attributes;
Then, we will continue creating an input, which is nothing more than a text entry, inside the return. To do this, we will use the component RichText to collect the code that we type on the screen:
// Pasamos de esto
<Fragment>
  <Controles {...this.props} />
  <Inspector {...this.props} />
  <div className={"bloque-parrafo"}>
    // Insertar el componente aquí
  </div>
</Fragment>

// A esto otro
<Fragment>
  <Controles {...this.props} />
  <Inspector {...this.props} />
  <div className={"bloque-parrafo"}>
    <RichText
      tagName={"p"}
      className={"parrafo"}
      value={parrafo}
      onChange={valor => setAttributes({parrafo: valor})}
      placeholder={__("Introduce un texto")}
    />
  </div>
</Fragment>
We would end up with all this code:
render() {
  /**
   * Variables
   */
  const { attributes } = this.props;
  const { parrafo } = attributes;

  const estilos = {};
   /**
   * Funcionalidades
   */

  /**
   * Contenido del editor
   */

  return (
    <Fragment>
      <Controles {...this.props} />
      <Inspector {...this.props} />
      <div className={"bloque-parrafo"}>
        <RichText
          tagName={"p"}
          className={"parrafo"}
          value={parrafo}
          onChange={valor => setAttributes({ parrafo: valor })}
          placeholder={__("Introduce un texto")}
        />
      </div>
    </Fragment>
  );
}
The RichText component uses the internal attribute we change to convert the entered text value inside external attribute paragraph by setAttributes. Then, it displays the value collected using the internal attribute value.
Once this is done, we will have a code input ready from the editor for our block to save text.
Using the block
Now we will execute the command npm start from the root of the project so that all code is compiled into a stable plugin. Simply, by entering a post or a page and looking for our block, we could use it.
With this we finish the article on how to program your first block in Gutenberg. It may have been a little complicated or you didn't understand everything, but cheer up, little by little you'll end up making big blocks. You know, if you liked the article and you have learned something new, share it and write a comment with your experience. Until the next article of the tutorial, a greeting ✋.
¡Subscribe to our newsletter and receive our offers, news and discounts directly to your email!


Pedro, what you have assembled is awesome, but, continuing with my hobby of breaking everything, there is something I am doing wrong, although I think I have followed all the instructions to the letter :). Some clue? He left you the error log:
In the terminal it says:
> brok-guten-blocks@1.0.0 start C:\xampp\htdocs\new\wp-content\plugins\brok-guten-blocks-master
> cross-env MODE=development webpack –watch
"cross-env" is not recognized as an internal or external command,
executable program or batch file.
npm ERR! code ELIFECYCLE
npm ERR! error 1
npm ERR! brok-guten-blocks@1.0.0 start: `cross-env MODE=development webpack –watch`
npm ERR! exit status 1
asl ERR!
npm ERR! Failed at the brok-guten-blocks@1.0.0 start script.
npm ERR! This is probably not a problem with npm. There is likely additional logging output above.
npm ERR! A complete log of this run can be found in:
npm ERR! C:\Users\pacos\AppData\Roaming\npm-cache\_logs\2019-10-07T16_17_12_320Z-debug.log
and in the debug.log
error code ELIFECYCLE
21 error error 1
22 error brok-guten-blocks@1.0.0 start: `cross-env MODE=development webpack –watch`
22 error Exit status 1
23 error Failed at the brok-guten-blocks@1.0.0 start script.
23 error This is probably not a problem with npm. There is likely additional logging output above.
Thank you very much
Hello Paco!! Have you tried using the 'npm install' command inside the brok guten blocks folder? I'll edit the post prior to this article to better explain how to use packages with node =)
Hello, thanks for your article, I find it very interesting, and it is clear that Gutenberg is the future of WordPress. I have a question, before, especially when you worked for a public administration, they required you to comply with certain accessibility standards. One of them was that the content would always be available with JavaScript disabled. Now with React and Gutenberg if you disable JavaScript nothing works. Is there a way to run it on the server? Or is that accessibility standard no longer applied? Thank you so much
Thank you very much, I'm glad you found the article interesting. I don't know exactly, but today JavaScript is basic in a web page and I've seen public administration pages using JavaScript, so I don't think there's a problem anymore. On the other hand, it is impossible to run it on the server, since JavaScript is a language that is interpreted by the browser. Have a good day!
Hello! I decided to update the WP version, it was 4.5. After that, several things were misaligned, which I was solving, except that when editing an entry it "duplicates" the first paragraph = drop + start of the text
The boss……
The boss….
I guess it's because it interferes with the code used by the site's developer, since before it defaulted to the first paragraph as lowered (bold) but didn't duplicate it.
I'm trying to find that code/function, it's not my thing….
If you have an idea where and how to look for it or a possible solution, WELCOME, because you cannot upload notes until you solve this issue… THANK YOU